Commonly Asked Questions - Answered
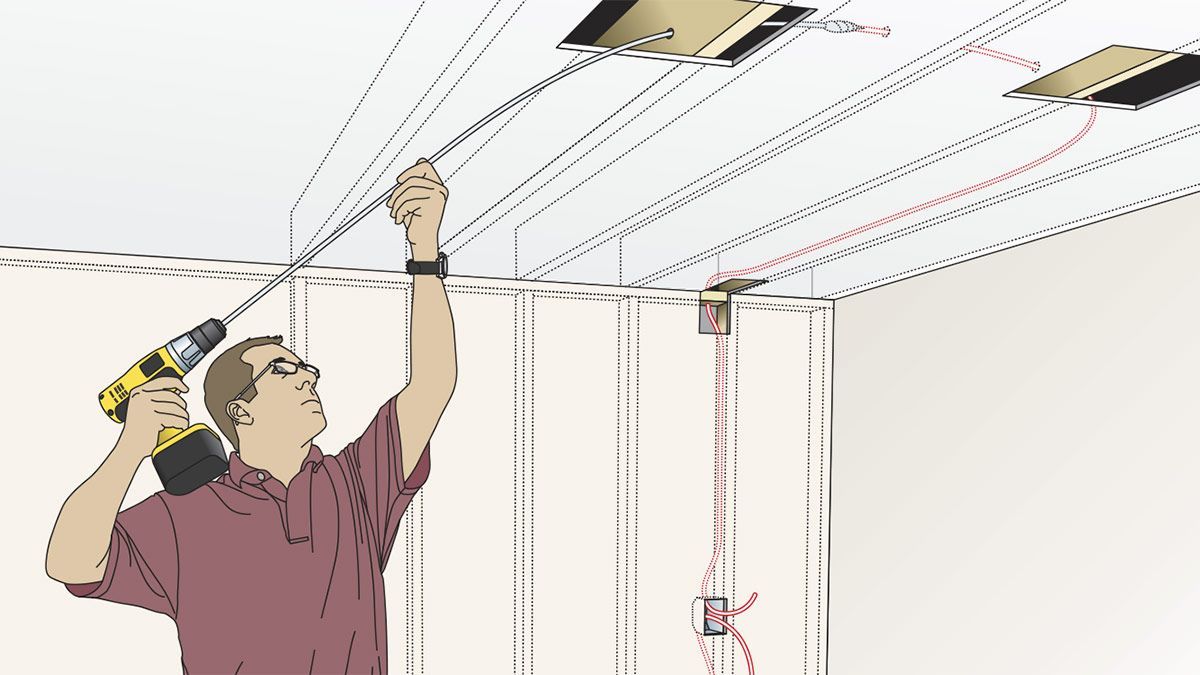
Installing an EV charger is not always as simple as mounting a charger beside the electrical panel.
In many homes, the electrical panel is located in a finished basement, utility area or another part of the house while the vehicle is parked in an attached garage. That means the new EV circuit may need to travel through finished ceilings and walls before it ever reaches the garage.
This is where wire fishing becomes an important part of a professional EV-charger installation.
At GO Electrical, we regularly use these techniques to route our #6 copper armoured cable from the electrical panel to the garage while minimizing damage to finished areas of the home.
What Is Wire Fishing?
Wire fishing is the process of routing electrical cable through concealed spaces inside finished walls and ceilings.
Instead of removing large sections of drywall to expose the entire cable route, an electrician uses existing cavities and carefully selected access points to move the cable through the structure.
Depending on the home, this can involve working through:
- Floor and ceiling joist spaces
- Finished basement ceilings
- Interior wall cavities
- Bulkheads
- Mechanical rooms
- Utility spaces
- Garage walls and ceilings
- Small, strategically placed access openings
A good wire-fishing job starts before the cable is ever pulled. The electrician first has to understand how the home is constructed and determine the most practical route between the electrical panel and the charger location.
Why Wire Fishing Takes Experience
Once drywall is installed, much of the structure behind it is hidden.
The electrician needs to determine where joists, studs and other obstacles are likely to be located while also considering plumbing, ductwork, gas lines and other electrical wiring.
A route that appears simple from one side of a wall may have several obstacles behind it.
Experienced wire fishing involves planning:
- Which direction the floor joists run
- Where wall cavities line up with ceiling spaces
- Where drilling can be performed safely
- How the cable will enter the garage
- How many bends will be required
- Whether the cable can physically pass through the proposed route
- Where small access openings may be required
- How to minimize disruption to the finished space
The goal is not simply to get the cable from Point A to Point B. It is to find a route that is safe, practical and as minimally invasive as possible.
Fishing #6 Armoured Cable Is Different
EV circuits present another challenge: the cable is considerably larger and heavier than the wiring commonly used for lighting or ordinary receptacle circuits.
For our EV-charger installations, GO Electrical uses #6 copper conductors as our standard, typically installed in armoured cable commonly referred to as BX when the installation is indoors.
The metal armour gives the conductors an additional layer of mechanical protection, but it also makes the cable heavier and more rigid.
Fishing this type of cable through a finished house can therefore require considerably more planning than fishing a small residential cable.
The route needs to accommodate the size and stiffness of the armoured cable while maintaining appropriate bends and preventing damage to the cable during installation.
This is one of the reasons experience with finished residential work matters when installing EV chargers.
From the Electrical Panel to the Garage
A common installation begins at an electrical panel located in a finished basement.
The charger may be mounted one or more rooms away in the attached garage.
Depending on the construction of the house, we may need to:
- Determine the direction of the ceiling joists and identify a viable route.
- Locate concealed cavities that allow us to move toward the garage.
- Create small access points where necessary to drill or redirect the cable.
- Fish the #6 armoured cable through the finished portion of the home.
- Transition the circuit into the garage.
- Continue the mechanically protected wiring method to the EV charger or EV-grade receptacle.
When done properly, much of the cable can often be concealed without opening an entire ceiling or wall.
Every house is different, however. Sometimes structural conditions, ductwork or other obstacles make additional access unavoidable. We explain those conditions before proceeding whenever possible.
Why We Use Armoured Cable for EV Installations
Armoured cable is part of our standard approach to EV-charger installations.
Many chargers are installed in garages or immediately outside the garage, where electrical wiring may be exposed to:
- Vehicles
- Tools
- Shelving
- Bicycles
- Storage
- Lawn and recreational equipment
- Everyday bumps and impacts
The metal armour surrounding the cable provides an additional layer of mechanical protection.
For indoor portions of the installation, we commonly use #6 copper armoured cable.
When the wiring is installed outdoors, we typically transition to #6 TECK90, which provides both mechanical protection and the appropriate rating for wet and outdoor environments when installed correctly.
Why We Standardize on #6 Copper
Not every EV charger is required to use #6 copper conductors.
Depending on the charger output, circuit rating, conductor type and installation conditions, other conductor sizes may be permitted.
At GO Electrical, however, we have chosen #6 copper as our standard for our EV charging circuits.
A 50-amp EV circuit places substantial sustained demand on the wiring. Rather than designing the circuit as close as possible to the minimum allowable conductor capacity, we prefer the additional capacity provided by #6 copper.
It also provides greater flexibility if the homeowner changes or upgrades their charging equipment in the future.
The goal is to install a circuit that does more than satisfy the immediate installation. We want the wiring system to be durable and suitable for the long-term demands of EV charging.
Clean Installation Is Part of the Job
Customers understandably focus on the charger they see mounted on the garage wall.
A large part of the work, however, may be happening elsewhere in the house.
Planning the route, fishing a large armoured cable through a finished basement, navigating structural obstacles and minimizing drywall damage can sometimes require more skill and time than mounting the charger itself.
For us, a professional installation means considering the entire path from the electrical panel to the vehicle.
That includes:
- Proper service and load assessment
- Correct conductor sizing
- Mechanically protected wiring
- Careful routing through finished areas
- Proper cable and equipment installation
- Torquing applicable electrical connections to the manufacturer's specifications
- Permitting and inspection
- Leaving the finished areas of the home as clean as reasonably possible
EV-Charger Installations in York and Durham Region
GO Electrical provides permitted EV-charger installations throughout York and Durham Region.
Whether your electrical panel is located directly beside your garage or on the opposite side of a finished basement, we can assess the available routes and explain how we would approach the installation before beginning the work.
If you are considering an EV charger, send us a picture of your electrical panel, the charger you plan to install and the area where you park.
We can help determine what is involved in getting power from your panel to your vehicle while keeping the installation as clean and practical as possible.